Tutorial – Split / Center Stitches in the Round
Split or center stitches are just like normal stitches except for where you place your hook. It’s much easier to work split stitches from the right side than from the wrong side, so they’re particularly great for working in the round without turning your work. Normal stitches are staggered between the stitches from previous rounds. As we’ve discussed before, this can cause the rounds to shift. Split stitches, on the other hand, line up directly above the stitches below them, so there’s no shifting!

This post contains affiliate links (click for more info). If you click one of these links and then make a purchase, I may be compensated. You get the same great prices, and you will be helping to support this site!
Split / Center Stitches – Photo Tutorial:
(scroll down for video tutorial)
The basics:
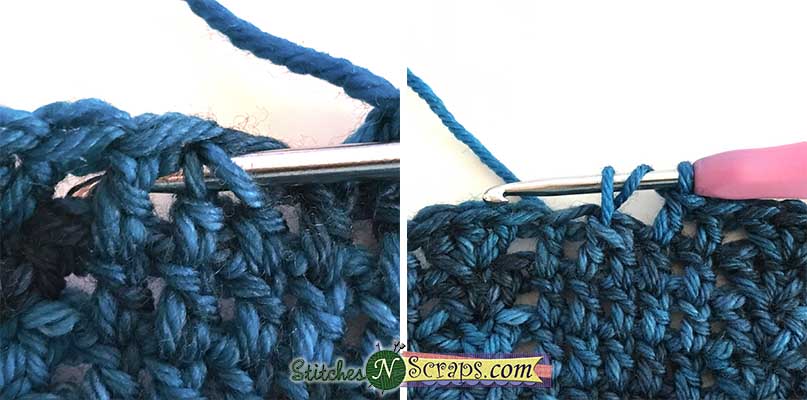
Almost every crochet stitch has a V shape at the top (shown here in blue). As we discussed when we talked about changing colors, this V is formed by the loop that was already on the hook before you started the stitch. for normal stitches, we insert our hook just under this V.

If you look at the post of a crochet stitch, you will see at least one more V. This is true whether it’s a single crochet or taller stitches. For split or center stitches, we’re going to insert our hook into this V at the top of the post.

Split stitches are worked exactly like normal stitches, except for where you place your hook. So really it’s not so much about what stitch you are making, but rather about what stitch you are working into. Here’s what it looks like to work into the different kinds of stitches.
Working into an sc
The sc is the smallest of the stitches and the entire post is just the one V, so it’s pretty easy to see. So for a split stitch, insert your hook in the center of that V to pull up your loop, and then finish your stitch as normal. Here I have worked a split dc into the sc.
 I’ve used a dc stitch here because it’s easier to see. If you work only split sc stitches for several rounds instead, it will look almost identical to knitting!
[the_ad_group id=”1380″]
Working into a dc or taller stitches
From a dc on up, you will find this same V at the top of the post. It’s a little harder to see this one because it twists a bit instead of lying straight. The picture above labelled “center of stitch” shows this on a dc stitch. All the tall stitches will look the same at the top, so just ignore the bottom of the post and focus on that V at the top. Here’s a split dc stitch, worked into a treble crochet from the round below.

Working into an hdc
Hdcs are a little trickier, because the yarn over creates a horizontal bar across the stitch. When working into an hdc, you could just ignore that bar and work into the center of the stitch like this:

The other option is to work through both that horizontal bar and the center of the stitch, like this:

Either way is ok, but both give the stitch a slightly different look. In the first case, the horizontal bar is more hidden. I don’t like this as much because it looks almost the same as working into an sc. In the 2nd case, the horizontal bar still shows across the stitch, so I tend to prefer that method.
[the_ad_group id=”1362″]
Working into a decrease or cluster stitch
A decrease or cluster combines several partial stitches into one. The key is to find that topmost loop of each partial stitch, and work through all of them together. So for example, let’s work into this dc2tog. Here you can see the topmost V from the 1st stitch (highlighted in red), and from the 2nd stitch (highlighted in blue), so you want to put your hook into both of those highlighted loops.

Here’s a split dc being worked into a dc2tog.
 A cluster is similar, it just has more loops on the top. This 5 dc cluster has 5 loops:

So to work a dc into this cluster, we just have to go into all 5 loops:

Just because you CAN work a split stitch into a cluster doesn’t mean I necessarily would. The top of a cluster is already pretty centered, so just working the stitch normally has a similar effect. The only thing working a center stitch does is twist the loops forward a little, and make the stitch you’re making a little bit shorter.
Split / Center Stitches – Video Tutorial:
If you’ve enjoyed these split/center stitches, I’ll have a pattern coming out soon that uses them! Look for that later this month.


You May Also Like
Knit and Crochet For Baby – 20 Adorable Patterns

Tutorial – Introduction to Bruges Lace