Tutorial – Basic Filet Crochet
Filet crochet can look intimidating, but it’s really an easy technique and can be used to make just about any design! You can make something simple, like this Heart Filet Block by I’m Hooked, or something more complex, like this Four Rose Doily by Elizabeth Ann White. There are even filet versions of the Last Supper and the signing of the Declaration of Independence!


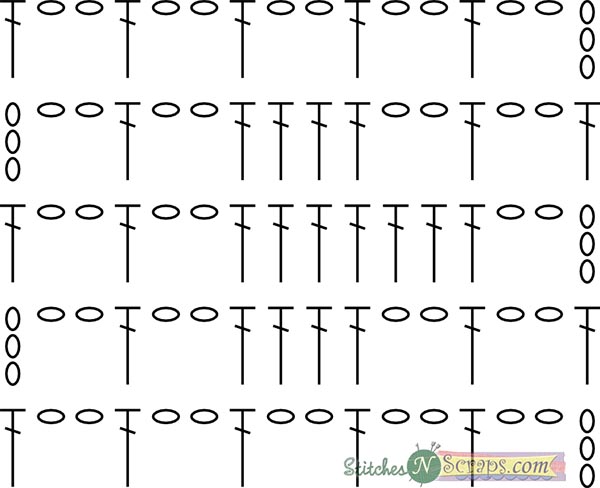
For this tutorial, we’re going to ignore the traditional chart and focus on how to read the filet chart.
Each square on the chart represents 3 stitches, with one extra stitch at the starting edge of each row. An open square is a ch 2 space and a dc, and a filled square is just 3 dc stitches.
Unless otherwise indicated, right side rows are read from right to left, and wrong side rows are read from left to right. Now let’s work through this together.
Foundation: This chart is 5 squares wide. At 3 stitches for each square, plus one stitch for the edge, that makes 16 stitches in total width. So here is my foundation row of 16 stitches – I chose to use foundation single crochet to start, but you can start with any sort of edge that you like, even just a chain.

Row 1:
Each row starts with that extra stitch, so let’s start the row by turning and making a chainless starting double crochet stitch (csdc), or (ch 3, turn, counts as a dc).
Let’s start with this as a right side row, but that doesn’t actually matter here because looking at the chart, this first row is just 5 open squares. That translates to (ch 2, sk 2 sts, dc in next st) 5 times. That was easy, right?

Row 2:
We’re going to start out exactly the same way as for row 1 – either turn and do a csdc, or ch 3 and turn. Now we’re on a wrong side row, so we’re going to read the chart from left to right.
First we have 2 empty squares. Since they’re both on top of open squares from the previous row, we’ll be skipping chain spaces instead of skipping stitches. So that’s (ch 2, sk ch 2 sp, dc in next st) twice.
Next there’s a filled square, which is 3 dc stitches. Since we’re on top of an open square, we make the filled square by working 2 dc into the ch sp, and then dc into the next st.
Finally, there are 2 more empty squares, so we work (ch 2, sk ch 2 sp, dc in next st) two more times. Here’s how that looks – see where the filled square was?

Row 3:
Remember to start the same way for each row – with a csdc or ch 3 and turn. On this row, we’re reading from right to left, because it’s a right side row.
The first square is empty – that’s (ch 2, sk ch 2 sp, dc in next st). After that there are 2 filled squares.
The first filled square is on top of an open square, so we know how to do that – 2 dc in the ch sp, dc in the next st. The next filled square is on top of a filled square, so we can just dc into each of the next 3 sts.
Then there are 2 empty squares, so we work (ch 2, sk ch 2 sp, dc in next st) twice. Notice how we always end each square with a dc stitch, whether the square is empty or filled?

Row 4:
Back on the wrong side again, and we start off the same way – csdc or ch 3, and turn.
Our first two squares are empty so (ch 2, sk ch 2 sp, dc in next st) twice.
The next square is filled, and is on top of another filled square, so dc in next 3 dc.
The next square is empty, but is on top of a filled square. Instead of skipping a ch 2 sp, we will be skipping 2 sts – so this becomes ch 2, sk 2 sts, dc in next st.
The final square is empty and is on top of an empty square, so we ch 2, sk ch 2 sp, dc in next st.

Row 5:
This is a right side row of all open squares. Start with a csdc or ch 3, turn, (ch 2, sk next ch sp or next 2 sts, dc in next st) 5 times.

Finishing:
Since I have a single crochet row on my starting edge, I’m going to go ahead and work a row of single crochet to finish. Here’s my finished motif!

That was a very simple pattern, but it’s one that makes a nice border or edging if you repeat it, particularly in a lighter weight yarn or thread.
The beauty of filet crochet is that any graph pattern can be worked exactly the same way – no matter how simple or complex!
To summarize, here are the rules:
- Start each row with the equivalent of a dc stitch (either a csdc, or a ch 3 that counts as a dc)
- For every open square, work (ch 2, sk 2 sts or a ch 2 sp, dc in next st)
- For every filled square, work 3 dc – either (2 dc in next ch sp, dc in next st) or (dc in next 3 sts).
This basic technique is the most common, but of course there are lots of possible variations. You can use taller stitches and wider spaces, or smaller stitches and narrower spaces.
You can form the open squares differently to make rectangles, large squares, or other designs for a different mesh texture (like in the center of the rose doily pictured above).
You can also add color if you want to, by working the filled squares in a different color. Like so many things in crochet, the foundation of this technique is simple, but the possibilities are endless!


6 Comments
kathrynpless1
Great tutorial! Thanks for sharing, I like Filet crochet and I’m just getting the hang of it so this tutorial will be a great reference.
Pia Thadani
That’s great! 🙂
Charmaine LaLande
Great job making it look simple!
stitches'n'scraps
Thanks! I promise, it really is 🙂
Jill
I much prefer working with a filet chart than written pattern.
Just love your butterfly chart.
Thanks for posting it.
Pia Thadani
Thanks! 🙂