Free Pattern – Mitered Mitts
These fun mitts are reversible – wear them one way for a mitered pattern on top, or switch hands for simple stripes. If you make them in a solid color yarn, you won’t get the colorful stripes, but will still see the different designs. They’re so much easier than they look, and work up quickly. This may become one of your go-to patterns for gifting or craft fairs!
This pattern is protected by copyright. Please do not distribute or share this pattern in any way other than by sharing a link to this page or to the pattern page on Ravelry. Click here for copyright information.
This pattern contains affiliate links (click for more info). If you click one of these links and then make a purchase, I may be compensated. You get the same great prices, and you will be helping to support this site!
Mitered Mitts

![]()
Add this to your Ravelry Queue
Materials:
- 125 yds DK weight, self striping yarn – you can use solid color yarn, but you won’t get the same striping effect.
- Size H / 8 (5 mm) hook or size needed to obtain gauge
- Size G / 6 (4 mm) hook or one size smaller than the other hook. This is for the ribbing. If you have a 4.5 mm hook that’s good too.
- Yarn or Tapestry needle
Difficulty:
Intermediate – Unique construction, some working in sides of rows, front post / back post ribbing.
Sizes:
Adult – one size fits most.
Gauge:
18 dc x 9 rows = 4 inches. You can use the first few rows as a swatch – after row 3, work should measure approximately 3.25 x 1.25 inches.
Abbreviations used:
- ch = chain
- dc = double crochet
- fpdc = front post double crochet
- bpdc = back post double crochet
- sl st = slip stitch
- st(s) = stitch(es)
- sp(s) = space(s)
Recommended Resources:
- Front and Back Post Stitch Crochet by Jessie at Home
- Edging – Working Evenly Across/Around
- Tutorial – Whipstitch seam through wrong side loops only
Instructions:
First Mitt:
Note: Ch 3 at the beginning of a row counts as a dc.
Hand:
Ch 12 loosely.
Row 1 (RS): Dc in 4th ch from hook and each ch across. (10 dc).
Row 2: Ch 3, turn, dc in next 8 sts, (2 dc, ch 1, 2 dc) in next st, dc in side of row 1. (14 dc)
Row 3: Ch 3, turn, dc in next 2 sts, (2 dc, ch 1, 2 dc) in next sp, dc in next 11 sts. (18 dc)
Row 4: Ch 3, turn, dc in next 12 sts, (2 dc, ch 1, 2 dc) in next sp, dc in next 5 sts. (22 dc)
Row 5: Ch 3, turn, dc in next 6 sts, (2 dc, ch 1, 2 dc) in next sp, 3 dc in next st, dc in next 14 sts. (28 dc)
Row 6: Ch 3, turn, dc in next 13 sts, 2 dc in next st, dc in next st, 2 dc in next st, dc in next 2 sts, (2 dc, ch 1, 2 dc) in next sp, dc in next 9 sts. (34 dc)
Row 7: Ch 3, turn, dc in next 10 sts, (2 dc, ch 1, 2 dc) in next sp, dc in next 5 sts, 2 dc in next st, dc in next st, 2 dc in next st, dc in next 15 sts. (40 dc)
Row 8: Ch 3, turn, dc in next 13 sts, ch 3, sk next 7 sts (thumb), dc in next 6 sts, (2 dc, ch 1, 2 dc) in next sp, dc in next 13 sts. (37 dc)
Row 9: Ch 3, turn, dc in next 14 sts, (2 dc, ch 1, 2 dc) in next sp, dc in next 8 sts, 2 dc in next sp (above thumb), dc in next 14 sts. (43 dc)
Row 10: Ch 3, turn, dc in next 25 sts, (2 dc, ch 1, 2 dc) in next sp, dc in next 17 sts. (47 dc)
Row 11: Ch 3, turn, dc in next 18 sts, (2 dc, ch 1, 2 dc) in next sp, dc in next 28 sts. Do not fasten off. (51 dc)
Seam:
Row 1: Do not turn. Rotate work so that you are working into the sides of the rows. Work 22 sc evenly spaced along sides of rows.
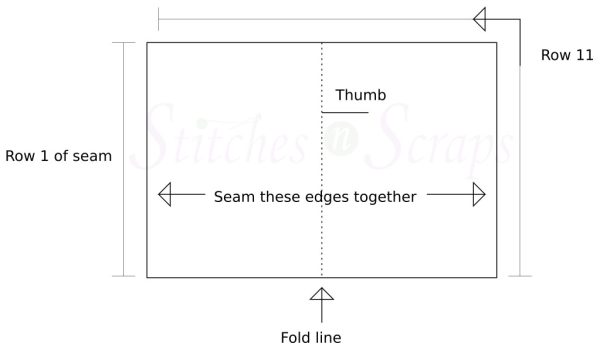
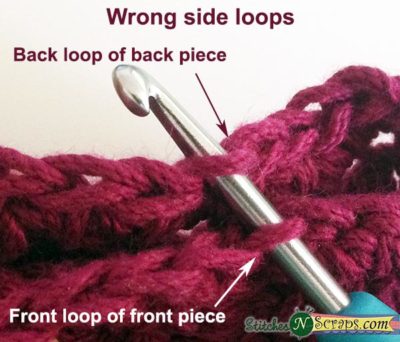
Row 2: Fold work in half with right sides together. The stitches from the short edge of row 11 of hand should line up with the stitches you just made. Working through the wrong side loop only on both pieces (front loop on front piece, back loop on back piece), slip stitch loosely in each st across. Your last sl st will be in a corner ch sp on one side. Do not fasten off.
Note: For more help in identifying the wrong side loops, see this tutorial: Tutorial – Whipstitch seam through wrong side loops only
Finger ribbing:
Turn the mitt right side out and make sure your working yarn isn’t caught inside. Rotate so you are working along the top edge of the mitt.
Row 1 (RS): With smaller hook – Ch 2 (does not count as a st), fpdc around first st, (bpdc around next st, fpdc around next st) 14 times, bpdc around last st, join with sl st to first fpdc.
Rows 2-4: Do not turn. Repeat row 1 three times more. Fasten off.
Cuff ribbing:
With right side facing, join yarn at seam on bottom of mitt.
Row 1 (RS): With smaller hook – Ch 3 (counts as dc), work 29 dc evenly around, join with sl st to first st. (30 dc total – 10 dc in bottom of stitches from row 1, 20 dc in sides of rows).
Row 2: Do not turn. Ch 2 (does not count as a st), fpdc around first st, (bpdc around next st, fpdc around next st) 14 times, bpdc around last st, join with sl st to first fpdc.
Rows 3-4: Repeat row 2.
Second Mitt:
Hand:
Repeat as for first hand, but row 1 is now a wrong side row instead of a right side row.
Seam:
Repeat as for first seam – remember, row 1 is now the wrong side row so you will be folding the work in the opposite direction – this is what makes one right handed the other left handed. When seamed, you should be able to arrange the mitts as shown in the main picture, with thumbs pointing in opposite directions when matching sides are showing.
Finger ribbing & Cuff ribbing:
Repeat as for first hand.
I hope you enjoy the pattern. Thanks to hillsjlg, Carbon14, amielokijasper, craftyvic & wilmaelee for testing the pattern!
A downloadable pdf of this pattern is also available in my Craftsy store or on Ravelry, for a fee. The fee for the pdf format is to offset the advertising revenue lost when you print or download the pattern rather than viewing it online.
If you would like to receive notifications of new posts and patterns as they become available, please follow this blog. You can follow by e-mail (look at the sidebar on the right for the follow by email option), or via RSS feed, or via your WordPress.com reader: Follow Stitches ‘N’ Scraps on WordPress.com-


5 Comments
Marleen
Lovely combination of colours!
Gigles
Thank you for sharing your pattern…I am looking forward to trying it!
Pia Thadani
You’re welcome! I can’t wait to see how yours turns out 🙂
Tresa F Webb
I need help with this pattern. I am stuck at seam, row two. How I can’t make my flip stitches align with the 11. Then I don’t know for the ribbing what is considered the too edge. Any guidance would be greatly appreciated.
Pia Thadani
I am adding a diagram – please let me know if that helps. The top is on top in the diagram – it’s the long edge from row 11 that you’re not seaming.