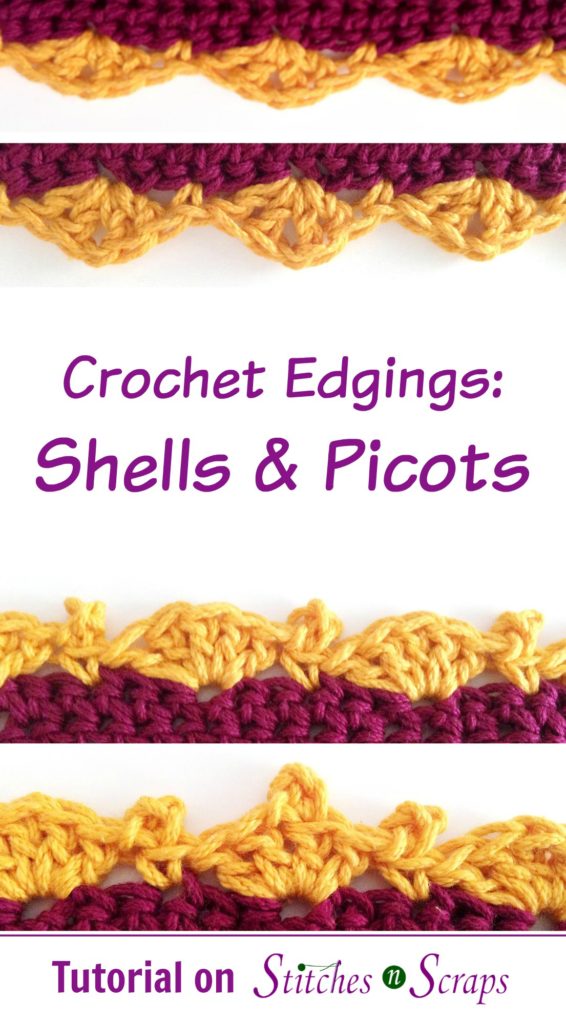
Edging – Shells and picots
Shells or fans are very popular for a decorative edging. If you get them spaced properly, they will lie flat and create a nice scalloped edge. Picots work well with shells too, and can add a little extra elegance and interest.
Simple Shells:
My Blueberry Hill shawl has a simple shell (or scalloped) edging, which you can see in the picture below.

Shell Width:
The width of a shell is determined largely by the height of the stitches you use. Generally speaking, a double crochet is about as tall as 2 stitches are wide. If you have a double crochet shell stitch, there will be one double crochet on each edge of the shell. This means it will span 2 skipped stitches on each side of the shell.

If I was using treble crochets, I would likely skip 3 stitches on each side. For half double or single crochet shells, I’d do 1 skipped stitch on each side. If you put them closer together than that, the edge will ruffle. If you space them farther, it will pucker and curl in.
Shell Fullness:
The fullness of the shell is determined by the number of stitches. A good rule of thumb is that you should have about the same number of stitches in your shell as the width of the shell. So for the double crochet shell above, which spans 5 stitches, I use 5 double crochet.
What makes the shell curve all the way is the shorter stitches between the shells. Usually these are single crochets or slip stitches. The resulting pattern repeat shown above is (5 dc in next st, sk next 2 sts, sc in next st, sk next 2 sts).
As we discussed when we talked about working evenly around, adding a chain space in the middle of a shell makes it pointier. So if we the shell as (2 dc, ch 1, 2 dc) instead of 5 dc, we get a more triangle shape, like this:

Corners:
So what about the corners? This depends on the placement of the edging.
Tall edge:
On occasion, you may want to end with a flat edge at the height of your border. An example of this would be if you were working on the hem of a cardigan, and wanted a squared off bottom for your button band as illustrated below. In this situation, you may want to end with a half shell (3 dc, if you’re doing dc shells).


Short edge:
If on the other hand, you just want a smooth scalloped edge all the way up to the end, you want to end with one of the slip stitches or single crochets between scallops.

Around the corner:
If you’re working around a corner, like on a blanket edge, you can put slip stitches, single crochets, or a large shell in the corner.
To do the slip stitch or single crochet in the corner, I would add a chain space of 1 or 2 chains, just to get around the corner and change direction. So I would do (sc, ch 2, sc), or (sl st, ch 2, sl st) in the corner, and then continue in pattern.

To do a rounded shell corner, remember you need to add extra stitches. Generally it’s a little more than 1.5 times the normal size of the shell.
You can think about this as half a shell for each side, and half a shell to turn the corner, making 3 halves. So instead of 5 dc, I would work 8 or 9 dc for the corner.


Adding Picots:
A picot is made by making a few chains (usually 3) and then slip stitching into the stitch you worked just before making the chains. When I do it, I like to slip stitch into the front loop and right leg of the previous stitch. See more in my Picot 2 Ways tutorial.
Placement:
Sometimes, you will want to add a picot into the middle stitch of your shells. For the dc shells we’ve been discussing, the pattern for this would be (2 dc, picot, 2 dc) or (3 dc, picot, 2 dc) depending on your preference. Other times, you may want to put the picots between my shells, by working a picot after each sc. The picture below shows it in both places.

Picot Corner:
You can also use a picot when working around a corner. For a picot corner, I would let the picot take the place of the ch sp between sc stitches, so it would be (sc, picot, sc) in the corner.

Stitch Counts / Repeats:
The repeat for all these edges we’ve discussed is 6 stitches (skip 2, shell, skip 2, sc or picot or sl st). Be sure to add in any extra stitches needed for the ends, depending on how you end it.
Shells and picots work well together, but they do create quite a long stitch repeat. If you’re going to use an edging like this, you need to plan ahead and make sure your stitch count will work for it. Remember to take into account how you plan to start and end the edging, so you can account for any extra stitches needed for that.


You May Also Like

Pattern Review – Monster Butt Pants by Donelda Higgins

20 Spring Cleaning Patterns to Knit and Crochet!
