Edging – Ruffles
This week, let’s get frilly! Ruffles are a fun and versatile way to edge your projects. Almost any stitch pattern can become a ruffle. The key is to work extra stitches into every stitch.
Simple DC Ruffles
If you’ve seen my Anemone blanket, you’ve seen a basic double crochet ruffle. To make this edge, I just worked 2 dc in each stitch.
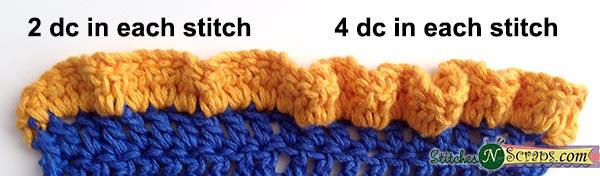
 This ruffle isn’t particularly full – since this is a baby blanket, I wanted something that wouldn’t catch on little crawling fingers and toes. You can make a ruffle as flat or as full as you want to, by adding more or fewer stitches. Here is a comparison of a ruffle with 2 dc in each stitch, and one with 4 dc in each stitch. You can use longer stitches too, but I don’t generally recommend anything shorter than a double crochet.
Fancy Ruffles
Plain ruffles are great, but if you have a large edge, they can get a little boring. You don’t have to be limited to simple stitches though. You can work almost any stitch combination as a ruffle. I tend to pick combinations of 3-6 stitches, and work each repeat into one stitch. For example, here’s a V stitch ruffle where I’ve worked (dc, ch 1, dc) in each stitch. You could make this much fuller by working 2 Vs in each stitch, i.e. (dc, ch 1, dc, dc, ch 1, dc) in each stitch. The chain spaces allow the ruffle to drape a little bit better and make it not quite as stiff.

You can even make ruffles with puffs or cluster stitches. For this pattern, I’ve used a 3 dc cluster. Cluster (cl) = [(yo, insert hook into stitch, yo and pull up a loop, yo and draw through 2 loops on hook) 3 times, yo and draw through all 4 loops on hook, ch 1]. To do this ruffle, I just worked 1 cluster in each stitch.
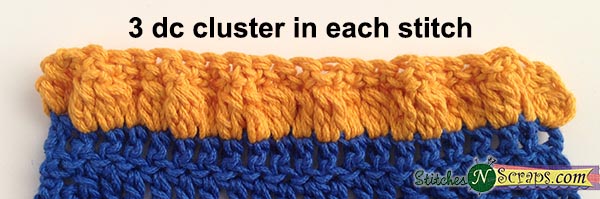
The neat thing with the cluster stitches, is each one is still just one stitch, meaning your stitch count hasn’t actually changed. If you turn and work back in the opposite direction, working 1 sc in each stitch, it will “set” the ruffle and keep it from flaring out at the sides. You could even have a ruffle in the middle of your project instead of at the edge!
Multi Tier Ruffles
Maybe you want a ruffle that’s 2 rows tall. Work your choice of ruffle for the first row, and then for the next row you have 2 choices. The first option is to just work 1 stitch into every stitch, you’ll extend the existing ruffle, just making it taller. If you’re working on a flat circle (like the Anemone blanket), remember that each round has to expand a little to keep the shape. If you just work into every stitch for your second row and you’re working in the round, your ruffle will flatten a little bit. The other option is to again work multiple stitches into each stitch. This will give you a tiered ruffle that flares out more in the 2nd row.
Now let’s put all of this together into a 3 row, 2-tiered ruffle. For row 1, which is a right side row, I worked the cluster in each stitch as above. For row 2 on the wrong side, I worked ch 1, turn, sc in each stitch. Then coming back on the right side for row 3, I worked (dc, ch 1, dc, ch 1, dc) in each stitch.
So next time you want a ruffle, get creative. Pick a stitch pattern you like and try using it as a ruffle. I’d love to see what you come up with, so be sure to share it with us in the Scrappy Stitchers Link Party!


3 Comments
Kathryn Pless
What a wonderfully simple way to add a ruffle to projects. Sometimes it’s the simplest stitches that are the best looking. Thanks for sharing!
Mary H
Would anyone happen to know if you can use these stitches on dishcloths or what I could do to make ruffles on a dishcloth?? Thank you
Pia Thadani
Yes, you can absolutely use any of these ideas on a dishcloth!